 Loading... Please wait...
Blog - MPOS265
MPOS-265 Printer Setup Guide
Posted by Microtrade Australia on 15th Sep 2022

MOS-265 Printer setup Guide
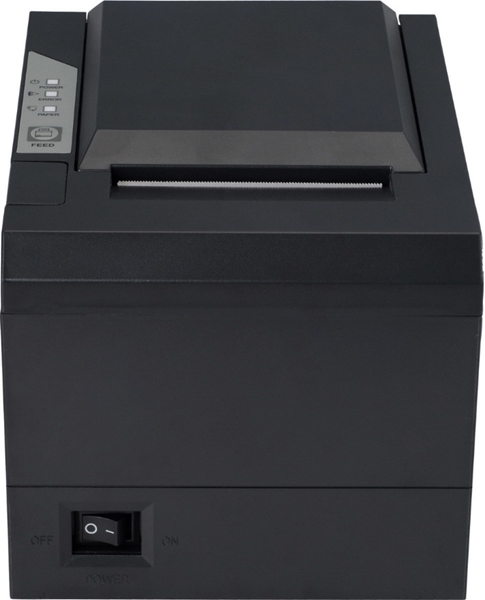
Table of Contents.
Connections on the back of the printer.
There are 5 Connections on the back of the printer.
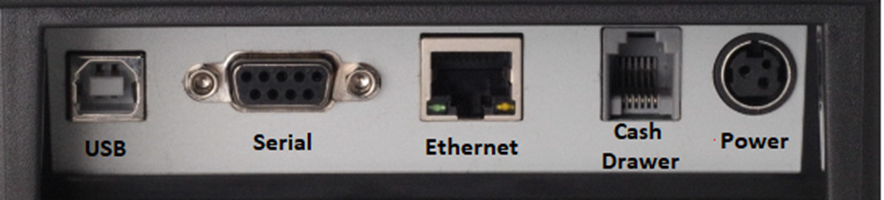
USB Connection
This is the most commonly used connection, simply plug the supplied cable into
this port (be careful of orientation as it can be plugged in upside down if a
little force is used). Connect the other end to a USB port on the computer. If
you are using a Serial or Network connection, then leave this unplugged.
Serial Connection
This connection is rarely used with modern computers. If your software requires
you to use a serial cable connected to the a COMM: port connect this cable. If
not leave this connection free.
Ethernet Connection
This is the printer’s connection for the LAN (Local Area Network) Connect a
network cable to this connection and plug the other end into the modem/router.
If you are using a USB or Serial connection, then leave this unplugged.
Cash Drawer Connection
If you are using a Cash draw then it should be connected here. DO NOT use
extension cables for to extend the length of the cash draw cable. They are NOT
the same as telephone cable.
Power Connection.
The connection from the power adapter fits here, be careful of the orientation
it will only go in one way.
Getting Started.
Decide which of the connection on the back of the printer need to be used and setup the printer with Power, USB, Serial or Ethernet cable. And if you are using one the cash drawer.
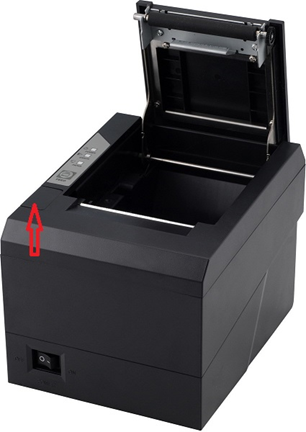
Install Paper into the printer.
The printer takes 80mm thermally coated paper just the same as you would see at Coles Or Woolworths. It is only coated on one side so it must be installed in the printer in the correct way.
Press the button on the printer to open the lid. This is illustrated in the image below.
The roll of paper is inserted into the opening, to determine if you have the paper in the correct way look at the loose end of the paper, when you hold it up it should be coming from underneath the paper roll and at the front of the printer. You should be able to hold the end of the roll up and close the printer without the paper getting in the way.
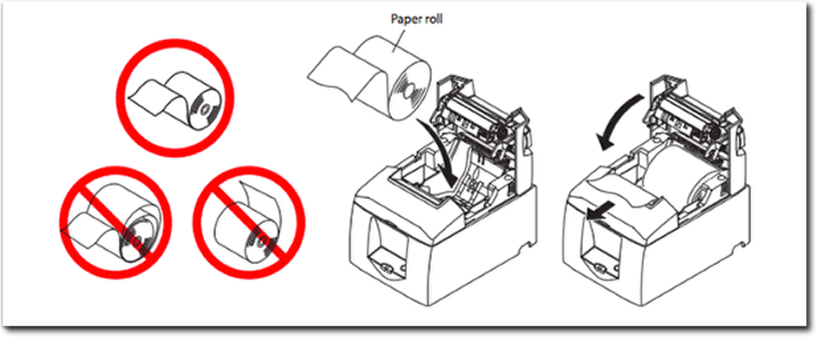
Printer picture for reference only.
Downloading and installing the printer driver.
The driver supplied by the manufacture is rarely up to date,
Checking the Microtrade website and going to the downloads page will give you
access to the latest driver.
https://www.microtrade.com.au/drivers/
When you click the Printer driver link you will be taken another webpage with the following image in the middle of the screen.
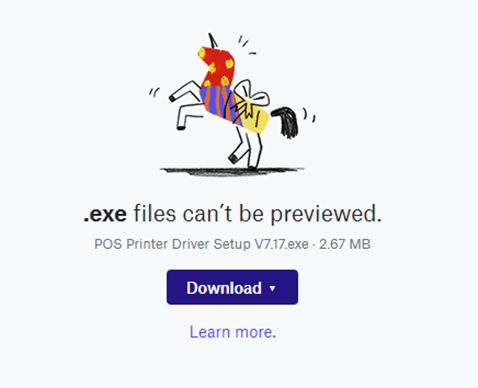
Click the Blue button that has Download on it. And the image will change
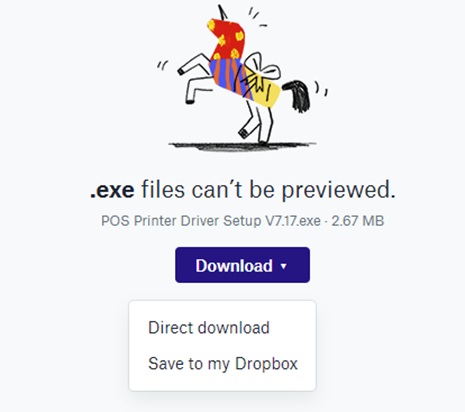
Click Direct download.
Depending which web browser you are using will determine what happens next, lets assume you are using the Microsoft browser.
You will be asked what you want to do with the file, just click RUN.

Once the printer driver is downloaded, if you clicked Run as suggested in the last step you will see the following screen displayed.
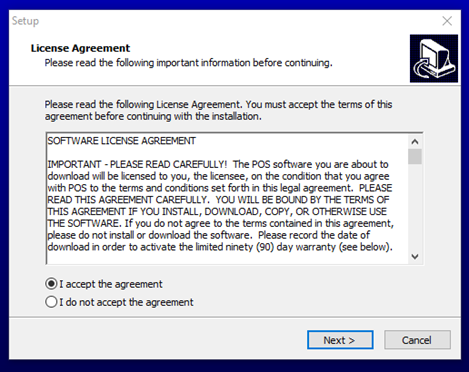
Make sure the “I accept the agreement” option is checked and then click the “Next >” button
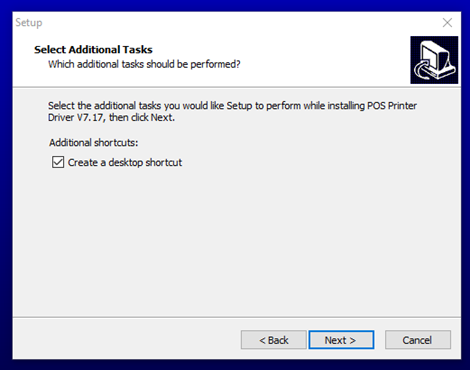
Make sure that “Create a desktop shortcut” is checked and click the “Next >” button
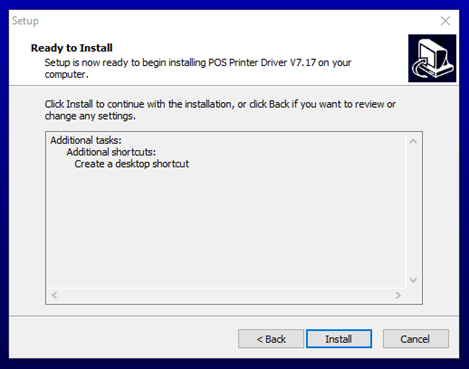
Click the Install button.

When you get the screen above click finish and the driver setup program will run automatically.
At this point this manual will continue with the various connection setups Please see the following sections for USB, Serial and Ethernet setup options.
USB Printer setup
Please make sure that the printer is connected to the computer via the USB cable, the printer has power connected and that the paper has been installed into the printer.
Continuing from the “Downloading and install the printer driver” section of this manual…
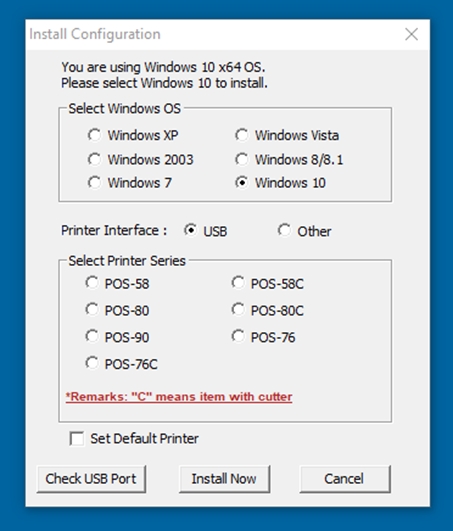
The last screen that was displayed in that section of the manual was the one below.
On this screen we need to check that the correct operating system is selected, and we need to select a type of printer.
Operating system. You will find that the program has already selected an operating system and this to date in all tests has never been wrong, so unless you are absolutely sure its wrong leave this section alone.
The installation also shows you 7 printers that can be selected and none of these may match the model number of your printer. This is because the options are based on the type of printer and not the model number
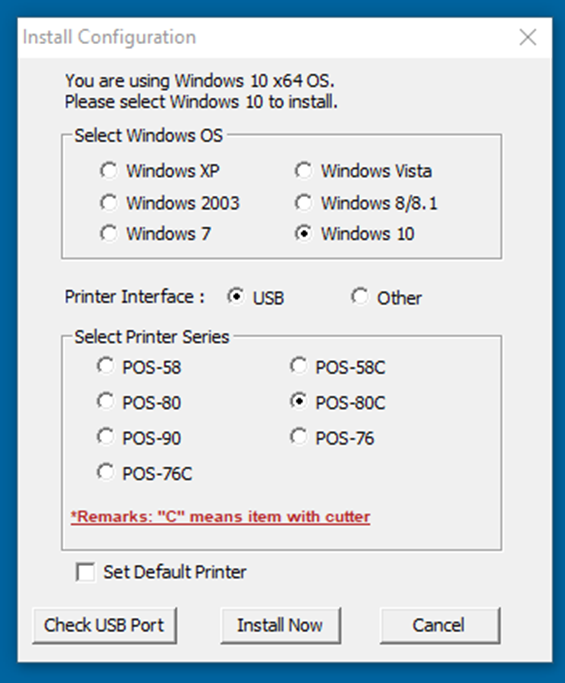
The standard POS printer we sell is an 80mm printer with a cutter, the correct printer driver to select is the POS-80C.
You also have the option of setting the printer as the default printer (this setting is recommended for Point of Sale computers and you are installing the receipt printer).
Click the “Check USB port” button and the printer should print a small test page.
If this does not happen then please check to make sure that the printer is properly connected to the computer with the USB Cable, the printer is powered on and that there are no error lights.
The try the check usb port option again.
When this has been completed then you can click the “Install Now” button and the program will install the printer for you
The program will display the following screen when it has finished installing the printer.
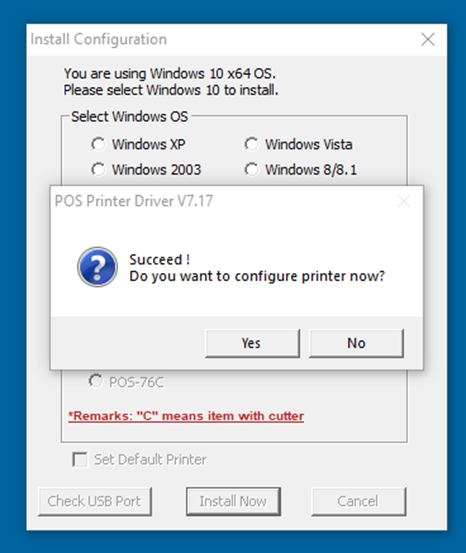
If you are doing the USB setup then click No and you have completed the printer installation.
IMPORTANT NOTE.
The printer is now setup on the USB port that it is currently plugged into. If for whatever reason the printer is unplugged from this port and connected to a different USB port the printer will not work and will need to be reconfigured or re-setup.
Serial Printer setup.
The installation and setup for the serial connection is very similar to the USB setup. Downloading and starting the printer installation program is identical on the Serial port as it is for the USB.
Please make sure that the printer is connected to the
computer via the Serial cable, that the printer has power connected and that
the paper has been installed into the printer.
The serial cable is the one with 2 screws on either side of the connectors.
Continuing from the “Downloading and install the printer driver” section of this manual…
The last screen that was displayed in that section of the manual was the one below.

On this screen we need to check that the correct operating system is selected, and we need to select a type of printer.
Operating system: You will find that the program has already selected an operating system and this to date, in all tests has never been wrong, so unless you are absolutely sure this setting is wrong leave this section alone.
The installation also shows you 7 printers that can be selected and none of these may match the model number of your printer. This is because the options are based on the type of printer and not the model number
The standard POS printer we sell is an 80mm printer with a cutter, the correct printer driver to select is the POS-80C.
You also have the option of setting the printer as the default printer (this setting is recommended for Point of Sale computers and you are installing the receipt printer).
When this has been completed then you can click the “Install Now” button and the program will install the printer for you
The program will display the following screen when it has finished installing the printer.

You need to click Yes on this screen as there are changes that need to be made in the printer driver itself before the printer will work.
A new window will open, and the current windows will close. The new window will look like the image below.
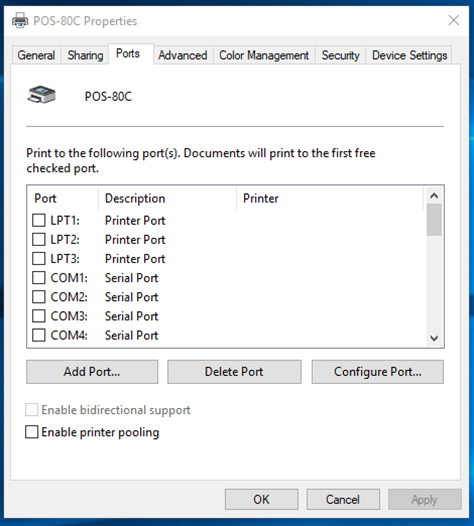
Another name for a serial port is a com port, in the printer driver it is referred to as a Com port.
Important note.
Many newer computers do not have a Com port on the back of the computer to
connect the printer to, if this is the case with your computer then you will
most likely need to install a USB – Serial port device on your computer.
Contact us if you think you need one of these.
Some computers have more than 1 Com port on the back of the computer, these may be marked Com1: through to Com4: or they may not be marked at all. Most computers only have 2 Com ports, so you have a 50/50 chance of this process working first time if they are not marked.
This document will assume that you have been able to locate a Com port on your computer and that you have connected the printer into com1:
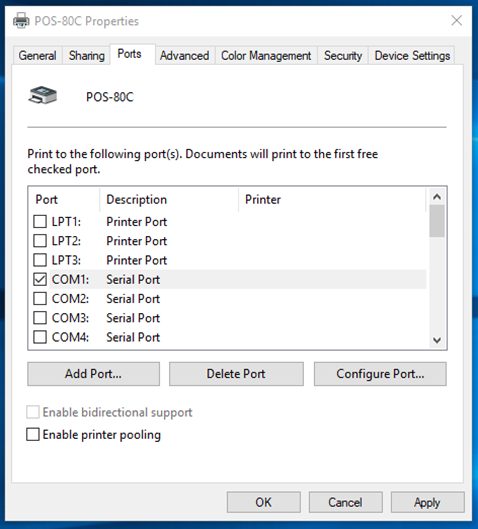
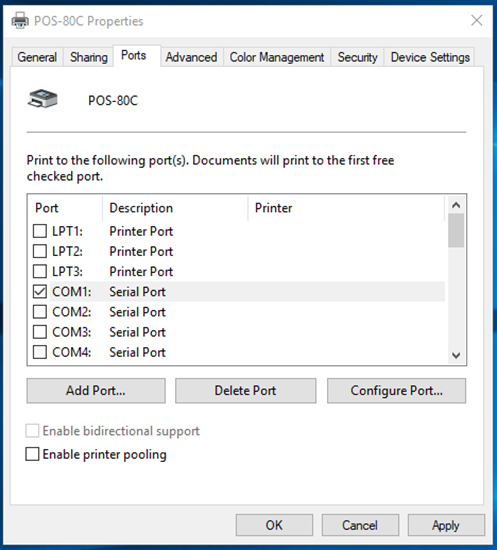
On the screen above you can see that there are 4 Com ports we are going to click on the Com1: option. See below.
We now have to tell the computer how it is going to communicate with the printer.
Make sure that the Com1 port is ticked and the Com1: line is
highlighted,
Click on “Configure Port…”
A new small window will open.
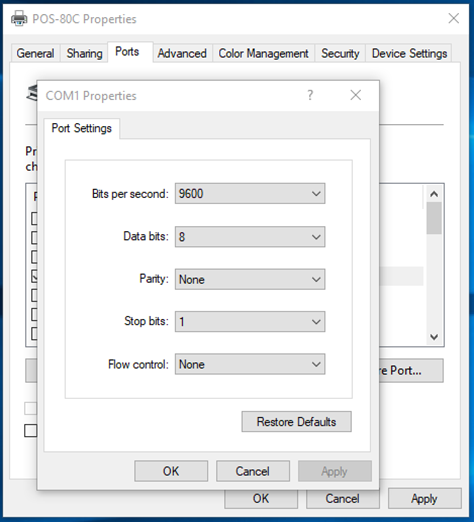
The new screen has a number of options. The ONLY one we will
be changing is the “Bits per second:”
option. The windows default for this field is 9600, it needs to be changed to
19200. Click on the down arrow on the right side of the field and a list of
values will be presented.
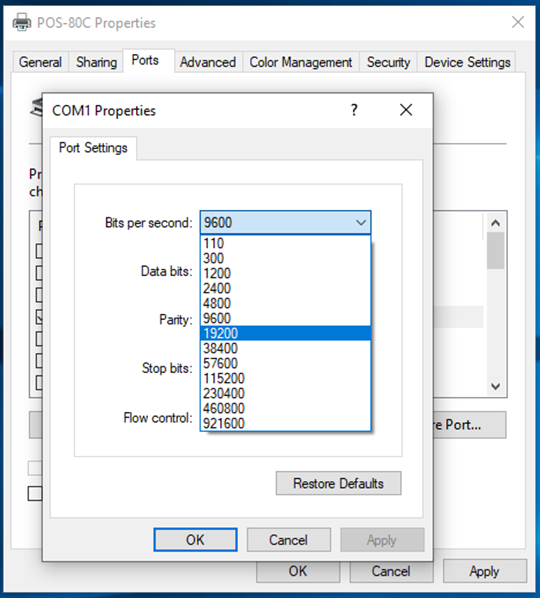
Highlight and click on the 19200 option
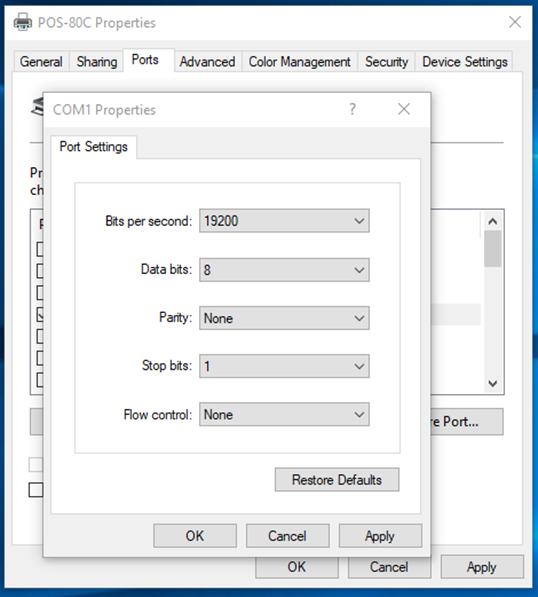
The screen should now look like the above image. Click OK
You will now be returned to the earlier screen see below.
Now click on Apply.
The only thing that should change on the screen is the apply button will change so It can no longer be clicked. DO NOT CLICK CLOSE YET.
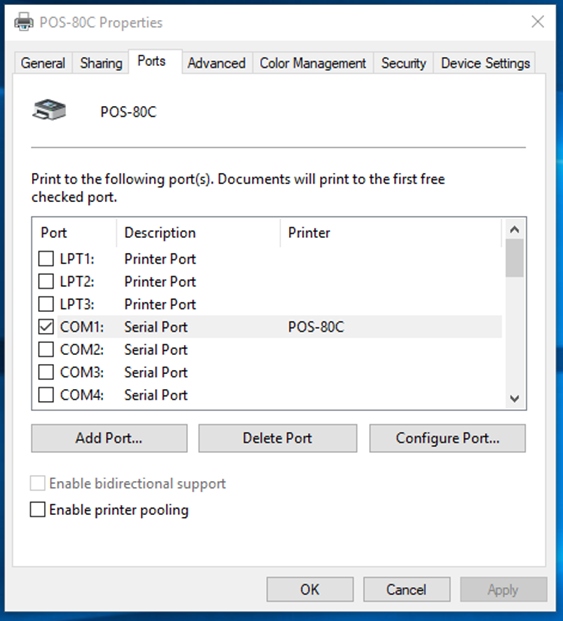
Click on the General Tab in on the top left corner.
A new screen will be displayed see below.

Click on “Print Test Page”
If a test print prints ok then you have finished the installation of the Serial Printer Driver.
Ethernet Printer setup.
Warning read before continuing.
Point of Sale printers are not as intelligent as other printers and do not have the automated processes that an HP document or similar printer has. Ethernet setup is more complicated and has more steps in it than other setups described in this document, it requires the person to have some understanding of networking principles. Some of the steps involved may lead to a computer and or printer not working correctly on the network. If you are not completely comfortable with going through this process, then it is strongly suggested that you get a local IT technician to install the printer for you. It is very difficult to talk a person through this process over the phone and even harder to work out what mistakes have been made if things are not working at the end of this process, also devices on a network are rarely the same and it is simply not possible to go into detail for every modem, router or networking device in a document like this. This document will continue with broad instruction on how to accomplish this but will not go into specific details with screen shots for specific devices except for windows screen and the printer.
Note: for any IT technical people reading this document. It has been written so that anyone can understand it and is not intended to be precise all technical aspects, rather to generate a basic understanding for people new to these principles.
Steps involved.
- 1.Determine what the IP address range of the network you are setting the up the printer on.
- 2.Decide the IP address that you need to set the printer to.
- 3.Reconfigure a computer on the network to a static IP address of 192.168.123.243
- 4.Connect the printer to a computer to enable the IP address change
- 5.Access the printer’s built in web page to change the printer settings to the required settings for the network that the printer will be used on.
- 6.Reconfigure the computer that you changed in step 3 to what it was previously (assuming it was working on the network when this process was started).
- 7.Install the printer driver.
- 8.Configure the printer driver so that it accesses a network address.
- 9.Test the printer.
If you are not completely confident with doing the above, stop now and get a local IT technician to complete this task for you.
Determine the IP address of the current Network
Starting on a computer that is already working on the network that you wish to connect the new ethernet printer to we need to access a command prompt screen. To bring this screen up right click on the windows start button and then select “Command Prompt” (note this is for windows 10 computers) The following windows should be displayed.
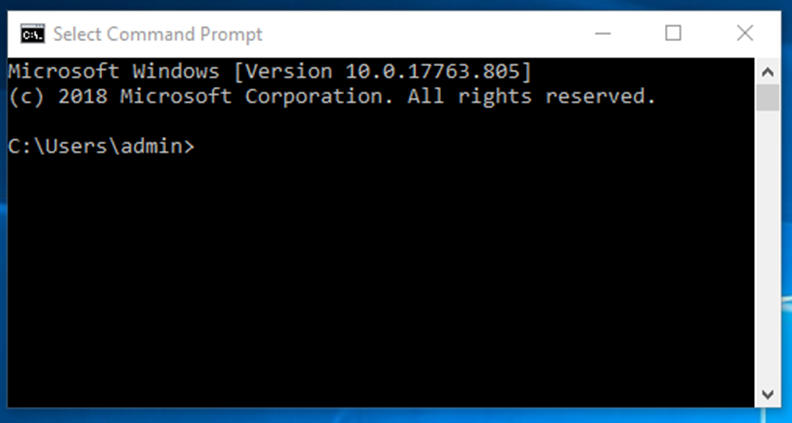
You now need to use a command that will show you the IP address of the computer you are working from. The command is “ipconfig” without the “”
Simply type ipconfig and press enter. The computer will then give you a lot of information, most of which you don’t need, the information that is needed is the IPV4 address, the Subnet mask and the default gateway as seen in the image below.

The image above is from my own computer used while typing this document.
My computer has an IPV4 Address of 192.168.1.110 (note this down you will need it later)
It has a subnet mask of 255.255.255.0 (note this down you will need it later)
It has a Default Gateway of 192.168.1.1 (note this down you will need it later)
Every device on a Local Area Network (LAN) must have its own unique IP address. While all the numbers in the IP address are important the numbers can be broken down into 2 groups.
These are the higher-level part of the address that specifies the network and the number of the device on the network.
The first 3 sets of numbers in an IP address signify the higher-level part of the networks IP address in my case the numbers are 192.168.1.
The number of the specific device (my computer) is 110, this completes the IP address of 192.168.1.110.
This can vary from net work to network, all networks will
have 4 groups of numbers that make up an IP address. Some networks may have the
first 3 sets of numbers as
10.0.0, 192.168.0, 192.168.1, 10.1.1 or none of these. I have no way of knowing
which network range you will have but suffice it to say that for a device to
work on your Local Area Network all devices will have those first 3 sets of
numbers the same and the last set will be unique.
Decide the IP address that you need to set up the printer on.
Networks that are connected to the internet have a device called a
modem/router, normally connecting a computer or printer to one of these will
get the device onto the network and able to access/be accessed with little or
normally no further work required on the part of the device user.
The modem/router has software installed on it that will automatically respond
to any devices on the network and work out a unique IP address for that device.
The issue we will face with a POS printer is that it’s not very smart and doesn’t ask the modem/router for an IP address, in fact it doesn’t try to talk to any other device on the network like most other devices do.
Modem/routers have a range of IP address that they can
allocate to devices on the network, and they are generally allocated to devices
on the network in the order that the devices are turned on.
The problem that this causes for a POS printer is that a device may not always
get the same IP address. For “Smarter” devices this doesn’t cause a problem but
for POS printers it does.
So why does this document feel the need to tell you this. If you manually give a device an IP address and the modem/router automatically allocates IP address on the network, eventually you can almost guaranty that two devices on the network could end up on the same IP address, thus creating a problem.
So how do we resolve that issue. As stated, the modem/router will give the first devices on the network the lower number in its range of IP address that it can allocate, what we need to do is pick an IP address that it a long way from the numbers that get allocated first. If the modem/router starts allocating IP addresses at the first unique number available say (on my network) 192.168.1.2 then choosing an IP address along way from this number is what we want to do. I.E 192.168.1.200. Why will this make a difference, because it is really unlikely that a small business will have 200 devices on the network so the modem/router will never try to issue this number to another device. Our POS printer will always have a unique IP Address. Remember out POS printer isn’t going to try and talk the modem/router so its unlikely that the modem/router will even know that the POS printer exits.
So, on my network my modem/router starts issuing IP address from 192.168.1.2 so for the sake of this example the IP address I am going to “choose” for this new pos printer is 192.168.1.200.
Reconfigure a computer on the network to a static IP address.
To recap, we know that the printer and the computer will need to share the first
3 sets of numbers in an IP address. When you receive new printer from
Microtrade it has a default IP address of 192.168.123.100, for a computer to be
able to communicate to the printer they must both share the same first 3 sets
of numbers in the IP address. Going back to the examples above my computer
doesn’t have to same first 3 sets of numbers in its IP address as the printer
and we know that the computer has an address automatically assigned by the
modem/router we must temporarily change one of the devices (printer or
computer) to share the same IP range as the other. We cannot do that directly
on the printer, so we need to change a computer on to the same range as the
printer. This will allow us to change the IP address of the printer so that it
matches the IP range that the modem router is going to automatically allocate.
To reconfigure the computer, we can use screens that are already built into windows to allow this to be done.
To begin start from the Windows Desktop.
On the keyboard locate the Windows key. (it’s the one with the Windows symbol
on it.)
Press and hold the Windows key and then press the ”R” key and you should get a
new windows that opens called the Run window.
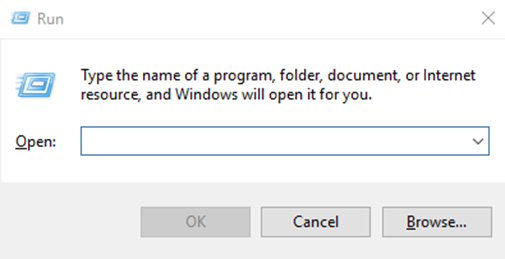
Type control into the Open field on this screen and then click ok and a new
screen will open.

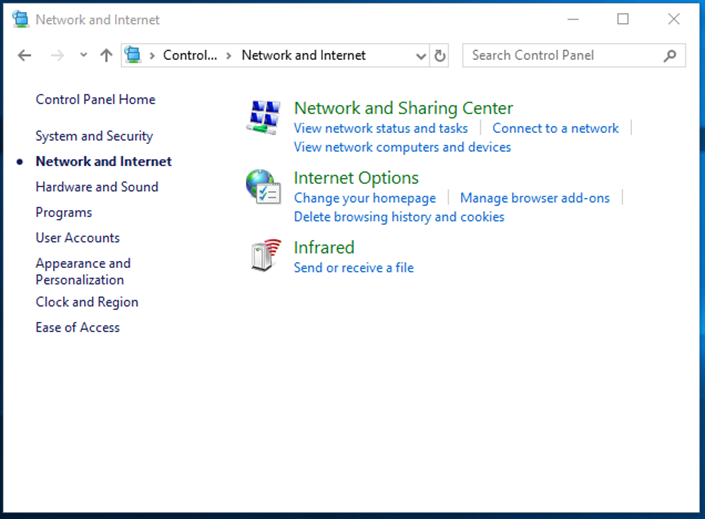
On this screen click on “Network and Internet” and the screen will change to..

Now click the “Network and Sharing Center” option.
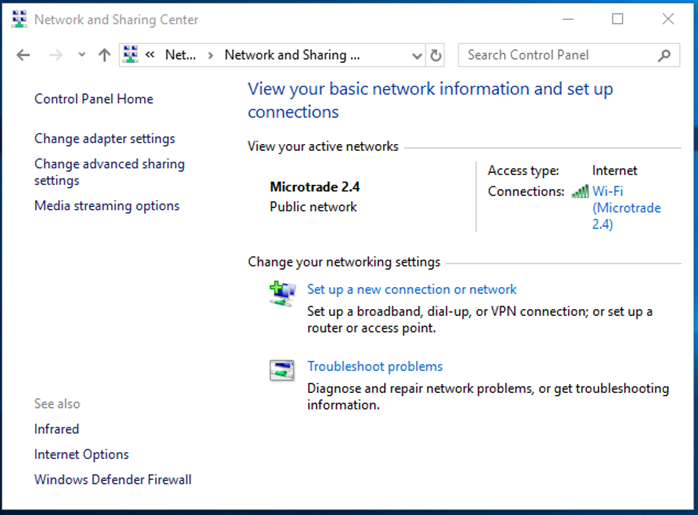
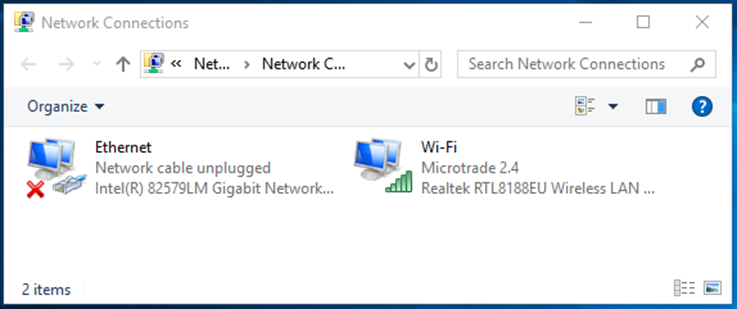
Now click “Change Adapter Settings” and a new widow will open.

On this screen you can see that there are two options, so far we have only discussed connecting to a network and not how you connect to a network. To change a printer IP address since its doesn’t have a wireless option we need to physically connect the computer and printer together using an ethernet cable. For the time being we are going to completely ignore any other devices on the network and just concentrate on the computer and printer. Connect an ethernet cable into the ethernet port on the back of the printer and connect it to the network.
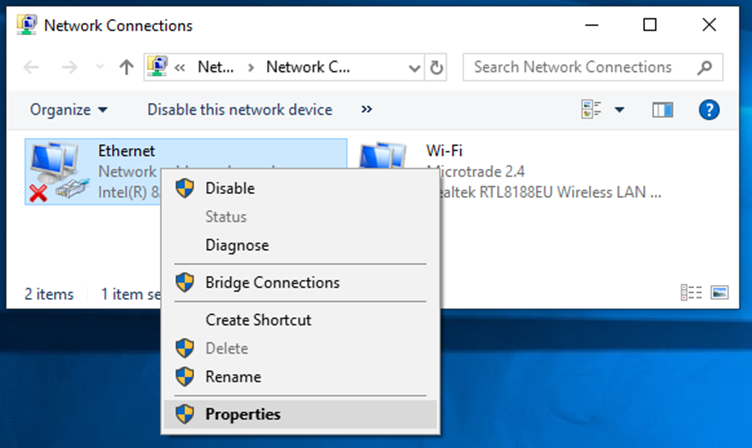
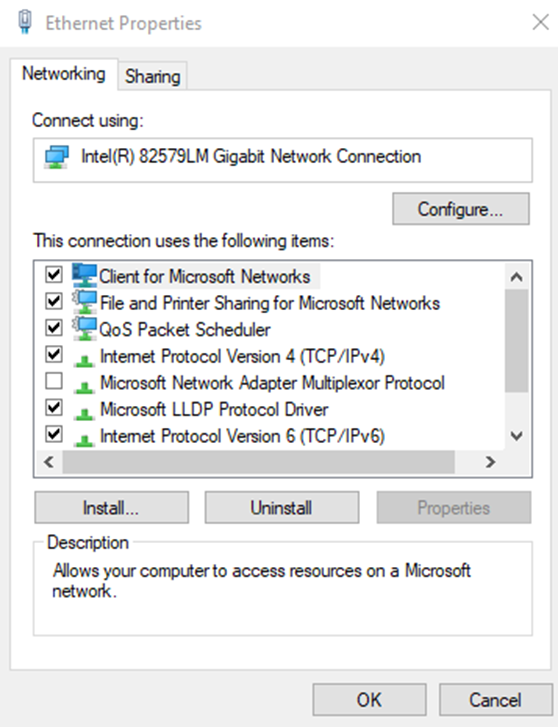
Once you have completed the above then you can right click on the Ethernet connection and then select Properties.

A new window will open like the next image.

The options that we need to
change are in Internet Protocol Version 4 (tCP/IP v4)
Double click that line (not on the tick) to access the properties screen as in
the next picture
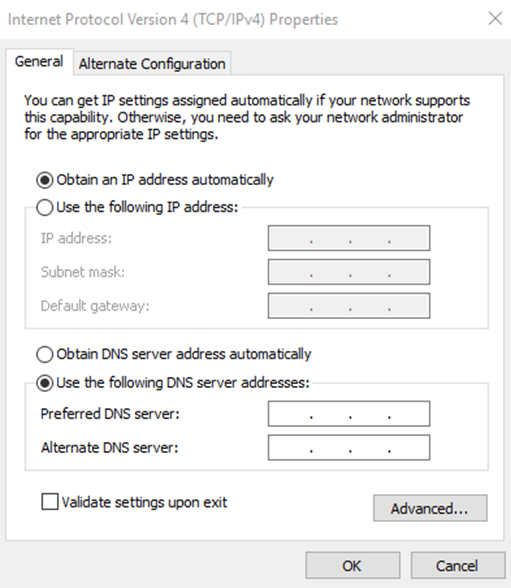
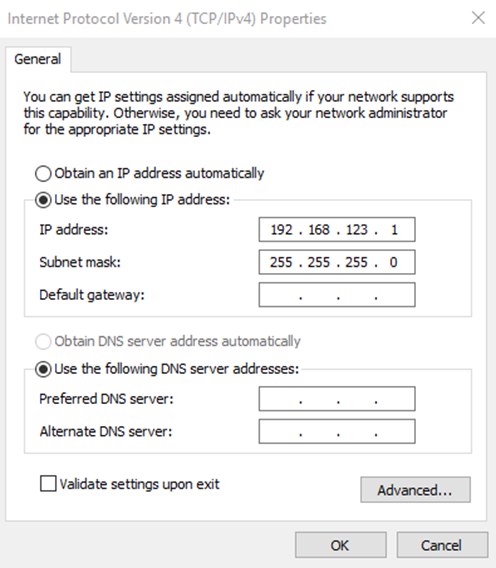
On this screen we are going to tell the computer to use the IP address that we want to use.
If these fields already have numbers in them take them down and keep them safe as you will need them later in this process.
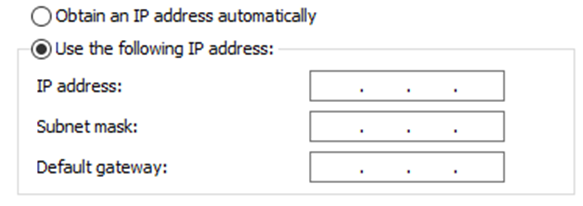
First click the “Use the following IP address:
Note that the image doesn’t show the complete screen. For the moment this is
the only part of the screen that will be used so the rest is not relevant.
For the IP address we want this computer on the same range as the printer is already on. So the first three sets of number need to be 192.168.123
The last number has to be unique so it can be anything between 1 and 255 the only exception being 100 because we know that this number is already taken by the printer. I would make the computer 1. So in the first field type 192.168.123.1 as per below.
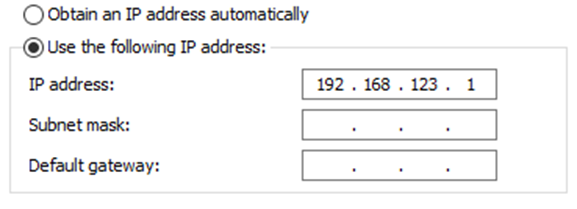
Lastley we need to enter the same Subnet Mask that the printer already uses. If it’s a new printer and no one has changed that field on the printer it will be 255.255.225.0, just click in the first field of the subnet mask number and Windows will normally fill it in for you. If it doesn’t then just type it in.

The default gateway field can remaing blank as it is not needed to be filled in as part of this process.
Now you can click on the OK button and it will return you to the previous page.

Click ok again. The page will close. You should be back on the Network Connection page. Just close all the pages back to the Windows desktop.
Access the printer’s built in web page
Open a web browser. It doesn’t matter if you use Edge, Internet Explorer or Chrome as they all do the same thing in this case.
Once the browser screen is open we need to type the IP address of the printer into the Address bar of the browser.

Note that this is not the where you would type a search word in google.

Press Enter and if everything has been done correctly then the screen you end up on should look similar to the one below.
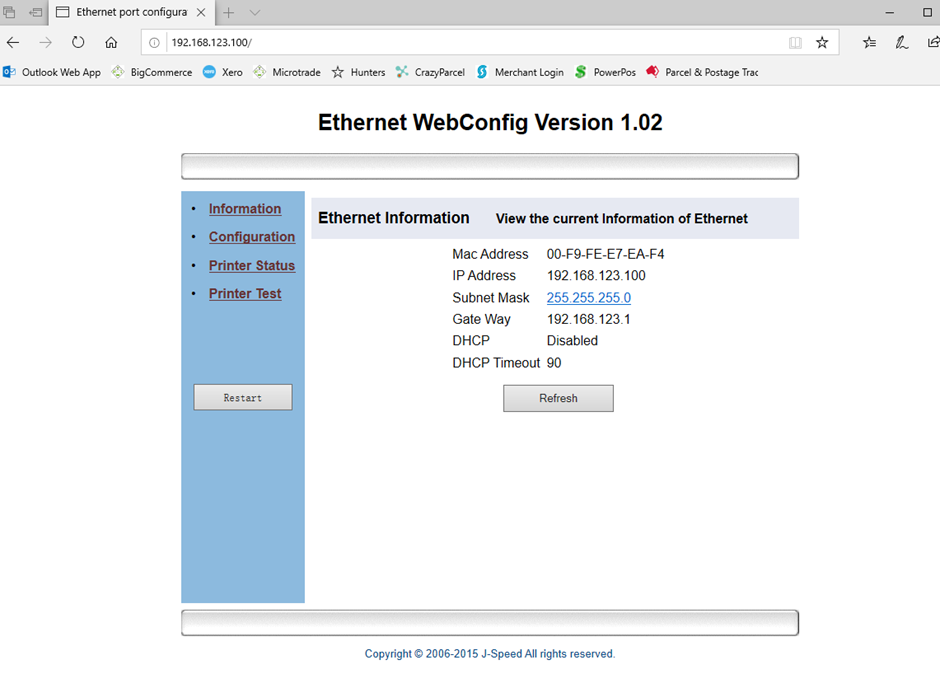
Now we can start to configure the printer. Click Configuration on the left hand side. And it will take you to the printer configuration page.
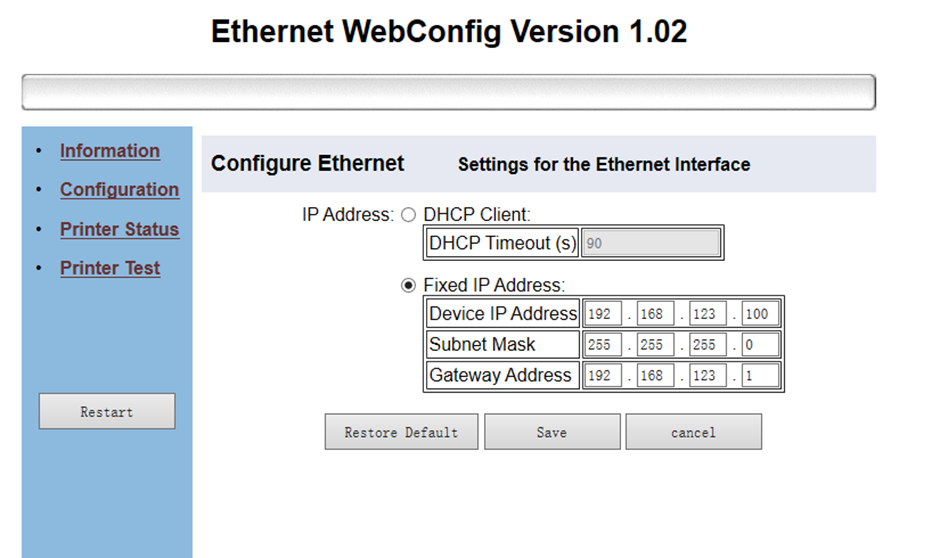
You can now see and change the settings on the printer.
Just like on the computer we need to change the IP Adress, Subnet Mask and this time the Gateway Address
We are now going to change the IP Address to the IP Address the we determined we need to use earlier. In this case for my computer it was 192.168.1.200, the subnet mask was 255.255.255.0 and the Default Gateway was 192.168.1.1
Double and triple check that you have the numbers correct as we don’t want to have to go through this whole section again because of a single digit that was put in incorrectly.

Click Save.
To finish setting the IP address on the printer now turn the printer off for 20 seconds and then back on again.
Close all the windows that are open and return to the Windows desktop.
Reconfigure the computer that you changed in step 3
You will now need to return the computer back to the way it was before we started changing settings. Go through the process again
On the keyboard locate the Windows key. (it’s the one with
the Windows symbol on it.)
Press and hold the Windows key and then press the ”R” key and you should get a
new windows that opens called the Run window.

Type control into the Open field on this screen and then click ok and a new
screen will open.
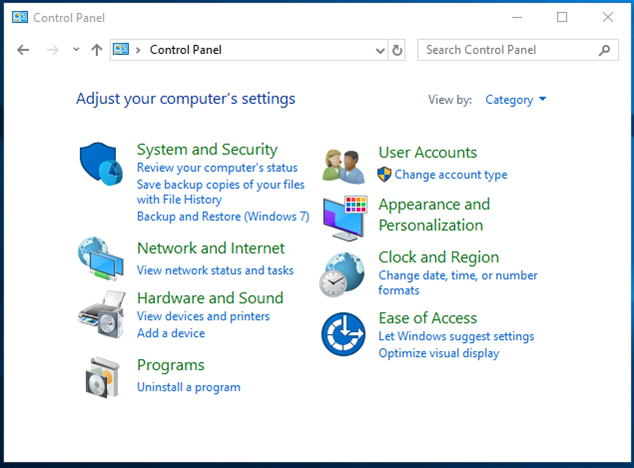
On this screen click on “Network and Internet” and the screen will change to..
Now click the “Network and Sharing Center” option.

Now click “Change Adapter Settings” and a new widow will open.
On this screen you can see that there are two options, so far we have only discussed connecting to a network and not how you connect to a network. To change a printer IP address since its doesn’t have a wireless option we need to physically connect the computer and printer together using an ethernet cable. For the time being we are going to completely ignore any other devices on the network and just concentrate on the computer and printer. Connect an ethernet cable into the ethernet port on the back of the printer and connect the other end directly into the computers ethernet port
Note: That I am taking the easiest way to do this operation and not the way I would do it myself as I believe that this will save a lot of typing and reading.
Once you have completed the above then you can right click on the Ethernet connection and then select Properties.
A new window will open like the next image.

This time you need to put the screen back to the way it looked before. In my example Obtain IP address automatically was checked.
If these fields already had numbers then replace the addresses you entered with the ones that were there prevoiusly.

Now you can click on the OK button and it will return you to the previous page.
Click ok again. The page will close. You should be back on the Network Connection page. Just close all the pages back to the Windows desktop.
Now you can reconnect the computer to the network cable it was orignally connected.
This part of the process is now complete.
Connect the printer to the network that you wish to use the printer on and make it ready to print. (Paper, Power and network connection etc.)
This step is self-explanatory, the printer needs to be setup on the network in the place where it is intended to be used.
Install the printer driver for Ethernet printers.
Continuing from the “Downloading and install the printer driver” section of this manual…
The last screen that was displayed in that section of the manual was the one below.

On this screen we need to check that the correct operating system is selected, and we need to select a type of printer.
Operating system: You will find that the program has already selected an operating system and this to date, in all tests has never been wrong, so unless you are absolutely sure this setting is wrong leave this section alone.
The installation also shows you 7 printers that can be selected and none of these may match the model number of your printer. This is because the options are based on the type of printer and not the model number
The standard POS printer we sell is an 80mm printer with a cutter, the correct printer driver to select is the POS-80C.
You also have the option of setting the printer as the default printer (this setting is recommended for Point of Sale computers and you are installing the receipt printer).
When this has been completed then you can click the “Install Now” button and the program will install the printer for you
The program will display the following screen when it has finished installing the printer.

You need to click Yes on this screen as there are changes that need to be made in the printer driver itself before the printer will work.
A new window will open, and the current windows will close. The new window will look like the image below.

For an Ethernet printer to work we have to setup a port on the computer to talk to the IP address of the printer. If the printer is to be used by multiple computers the printer driver will need to be installed and configured on each and every computer that need to use the printer.
Configure the printer driver so that it accesses a network address.
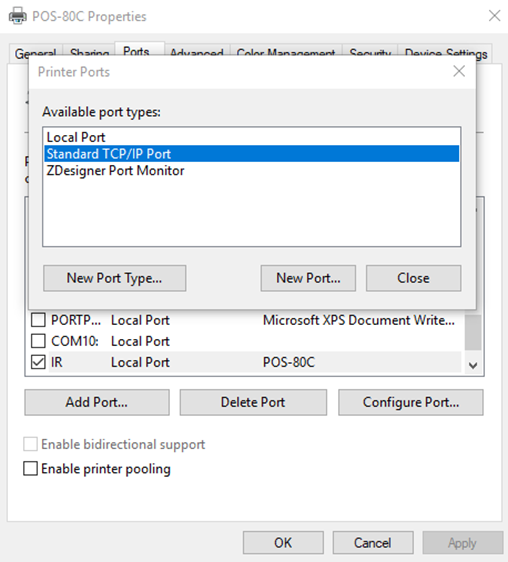
Click on Add Port.. a new smaller window will open
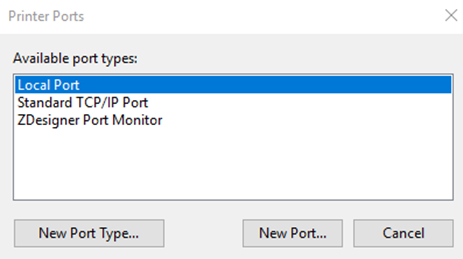
Click Standard TCP/IP Port to highlight it.

Click New Port…
We now start using a Windows built in process to add the port.
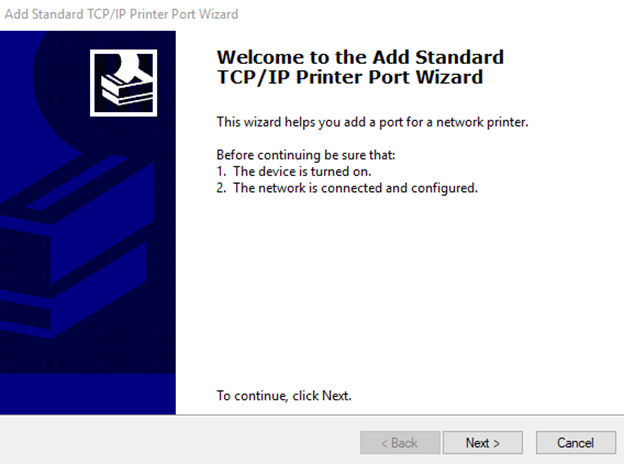
Click Next >
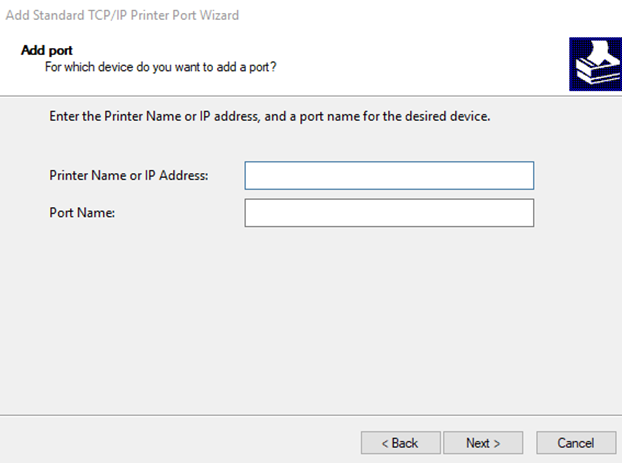
On this screen enter the IP address that the printer was configured to use.
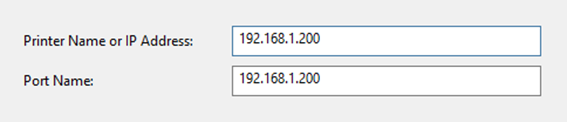
Note. Only the Printer Name or IP Address field needs to have any information put into it. The Port name will be entered automatically by windows and does not need to be changed.
Click Next
A screen will be displayed showing that Windows is automatically searching for the printer. This could take a minute or so before the window changes to the next screen, just be patient and leave it alone.
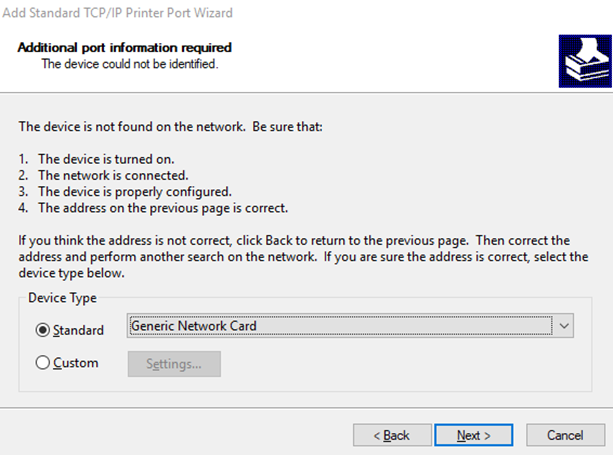
On the next screen Windows is going to let you know that it could not work out “what type” or “if “ there was a printer on the network at the address you wanted it to look for a printer. See previous comments about how smart the printer is.
This is completely normal just click Next >.
This takes you to the final part of the setup of the printer port.
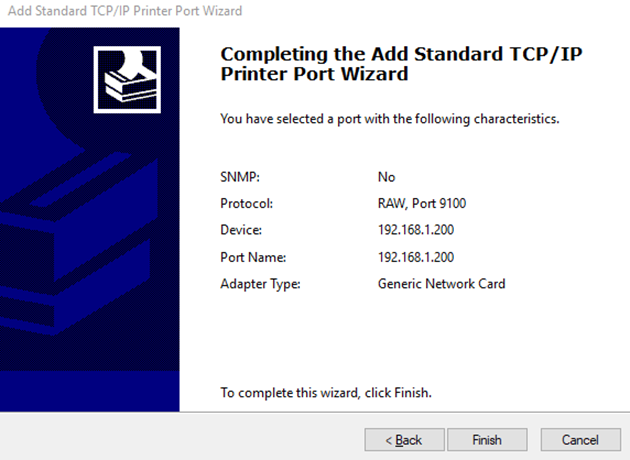
Click Finish and this will return you to the Printer Ports Screen
Click Close.
This will return you to the printer Properties Screen and a new port will have been created and should already be selected. Click Apply but do not click Close yet.
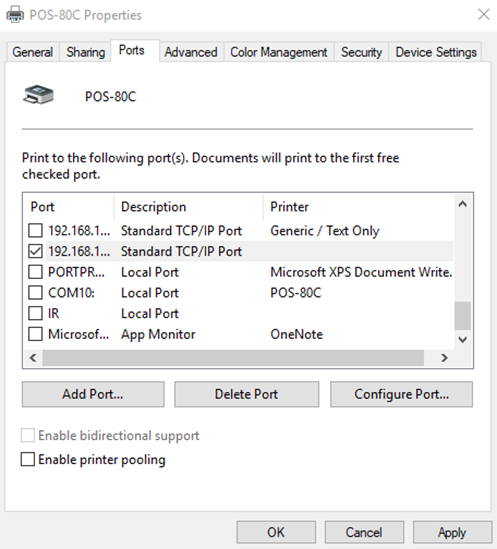
Then Click on the “General” tab at the top of the screen.

Test the printer.
Print Test Page can now be clicked and if all went well the printer should print out a test page on the network attached printer.
If the printer did not print a Test Page then go to the Trouble Shooting section.
Trouble Shooting
How to check the printers IP address
The printer can print a settings page. On the printout the page will list out among other things IP address that the printer has been set to.
To print the settings page, follow the process below (read it all the way through first because there is a time element involved in the process.)
Make sure the printer is ready to go, Power, Paper etc
Turn the printer OFF.
Press and hold the feed button and turn the printer back on.
On the printer there are 3 lights, Power, Error and Paper, when you turn the printer back on the watch for the Error and Paper lights, when they flash red you need to release the feed button straight away, if you hold it too long nothing will happen and you will need to start again.
If you hold the feed button much too long the printer will go into “Dump” mode and as before you will need to turn the printer off and start again.
How to check the printer is on the network.
Devices on the network can talk to each other. Windows has built in commands that allow you to test the communication between devices.
Bring up a command Prompt.
To bring this screen up right click on the windows start button and then select “Command Prompt” (note this is for windows 10 computers) The following windows should be displayed.

First lets check that things are on the same network range type ipconfig and press enter. The computer will then give you a lot of information, most of which you don’t need, the information that.
is needed is the IPV4 address, the Subnet mask and the default gateway as seen in the image below.

The image above is from my own computer used while typing
this document.
Now that we know the computers IP address, we need to find out the printers IP
address.
Print out the printer settings page as described in the previous section.
Check the page for the printers IP Address