 Loading... Please wait...
Adding a Product For MPOS Software
Posted by Microtrade Australia on 15th Sep 2022
Product Entry.
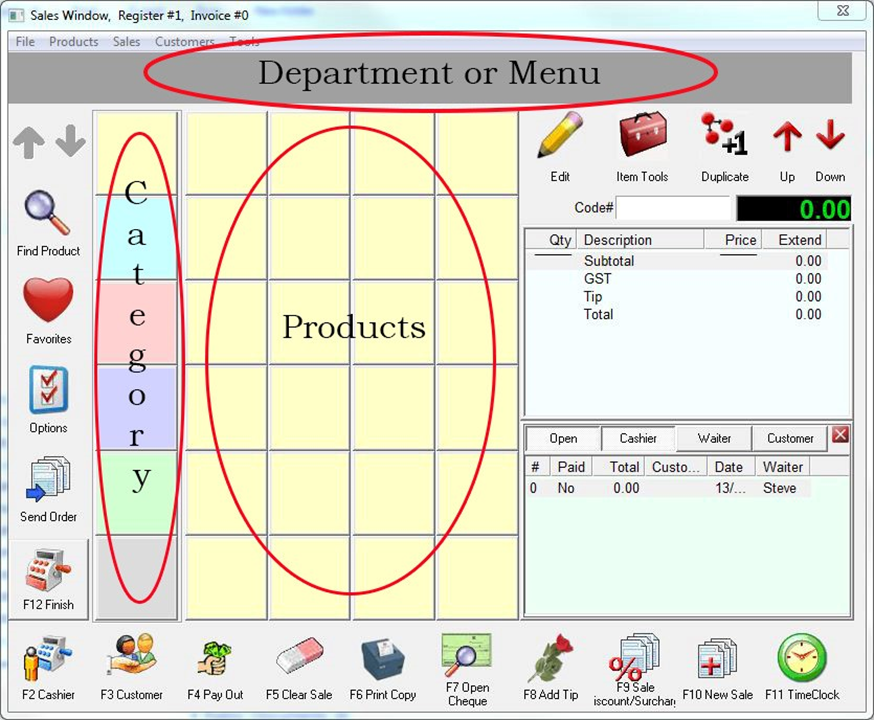
Before we begin with product entry it’s important to understand the components of the main window and the requirements that a product must meet for it to show as a button.
The picture below is an image of the main sales screen the highlighted areas will be discussed as part of the product entry.
To start entering products open the program (close setup starter if it opens) and from the main control screen select Manager.
On the manager screen from the top row of options select Products and then Product Control. On the new screen that opens you will see a button labeled New
Click New and then New again. For the moment ignore all the other options they will be discussed later.
The following screen will appear.
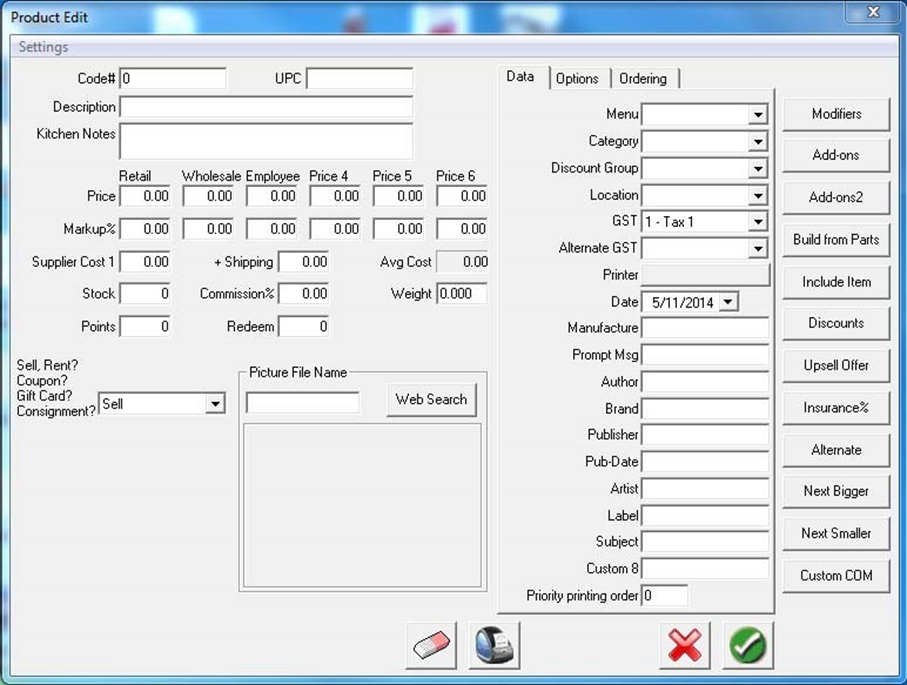
The follow is a breakdown of the fields on this screen.
Code – This is the record number that the product will be stored under in the database. You can allow the system to set this number or you can enter your own, but the number MUST be unique.
UPC – UPC stands for Universal Product Code and is used for storing the barcode number of the product (if the product has one). It can be filled out or left blank.
Description – This is the product name and is what will appear on any printouts so don’t make it too long.
Kitchen Notes or Notes – This field can be used for detailed information about the product. It will only print if you set it to do so in the Printer Options section under Settings.
Price Line:
Retail – The retail price of your product. It can either contain the tax inclusive price or the tax exempt price dependent on how you set the system to handle tax in the Tax and Precision section of settings.
Wholesale – The wholesale price
Employee, Price 4, Price 5, Price 6 – You can use these price fields for any customer group that you wish to. And they can be picked up automatically from the customers record.
Note: - Please not that all the headings Retail, Wholesale, Employee, Price 4, Price 5, Price 6 can be changed to anything that you want to them to be. To change the headings from the Main Control Screen, select Manager, then Sales then Discount Level
Markup% Line – This line can be used to automatically calculate the fields in the price line based on cost * Markup%
Cost – The cost price of the product. (including GST)
Stock – Enter the quantity of the item currently on hand. Each time the item is sold the system will automatically subtract the quantity sold. (See important note at the end of this chaper)
Points – Powerpos has a inbuilt customer loyalty program and this field is used to determine the number of points that will accrue with each purchase.
Redeem – The number of accrued points a person will need to use the customer loyalty program and get this item for free.
Please note: The maximum number of points a person can accrue is 255 so set the numbers small.
+ Shipping – Enter the shipping cost of the item here. (it will automatically be added to the sale)
Commission% - If your employees work on a commission basis enter the percentage commission for this product.
Avg Cost - You cannot enter anything in this field but it is very important. The average cost is determined by the cost price of the item each time it is sold. If you sell an item and then change the cost price the avg cost of the item will be affected. This field is used by many of the reports and should this become incorrect by entering an incorrect cost price then your profit and loss reports will be incorrect.
The dropdown box with Sell in it. Will be discussed at a later time.
Menu/Department and Category - Dropdown list.
These fields determines where a product can be found on the system, they work together. To create a new entry in these fields you need to click the down arrow and then select *NEW*
Doing so will open a new screen and you can simply type a a heading that you wish to use in the description field and then clicking SAVE or simply by pressing enter. You can enter new entries either singly or you can setup several heading at a time.
An example would be that if you wished product called Cappuccino appear under Hot Drinks and the
Coffee you would need to create a department/menu item called “Hot Drinks”
You would click the down arrow on the department/menu field select *NEW* and then type hot drinks into the description field and click SAVE. Hot Drinks will now appear in the department/menu dropdown list.
You would also need a Category called Coffee and this is created and selected in the same way.
If you then saved a new product with the description Cappuccino with the Department/Menu Hot Drinks and the Category Coffee, a price of $3.20 you would be able to go to the sales screen and find and sell Cappuccino’s.
I would recommend that you limit the number of Department/Menu choices to 10, if you exceed this amount then the large buttons across the top of the sales screen will split in 2 horizontally and make them more difficult to select if you’re using a touch screen.
Sub-Category and Location. Use these fields as you wish, they can be useful for locating products in storage etc.
GST – You can have differing levels of GST in Australia, Water for instance has 0% GST whereas other products have 10%. In the Tax and precision menu under settings you can set 3 levels of GST and then mix and match with this field.
Printer – PowerPos has the ability to direct printouts to various printers within a business. An example would be you could print a coffee order to a barista. You will be able to choose which printers that you wish a product to be printed at by clicking this button and then ticking the appropriate printer
The fields for Manufacturer, Author, Brand, and Publisher are self-explanatory and will not be covered here.
Prompt Msg – This field is only used when certain options are selected on the options tab, this will be covered in more detail later.
Author, Brand, and remaining fields – These field are for your information only. Use them in the way
that you see fit. headings can be changed to something more meaningful to you by going to Manager/Settings/Terminology.
Prompt Msg – This field is only used when certain options are selected on the options tab, this will be covered in more detail later.
To enter your first product it must contain the following information as a minimum.
1, Code (a unique number)
2, Description
3, Price (preferably retail) 4, A Menu or Department location
5, A Category.
If the product that you enter contains all of these items then it will appear on the sales screen in the location provided in the menu/department category.
Important note: - There are many products that you will not need to keep a stock count because it may be something that you make I.E a cup of tea or coffee. You can find out the numbers of these items you have sold by running a report. I strongly advise that if this is the case that when you are entering the product that you click on the Options Tab on the top right of the product entry screen and then tick the first option “Service” This will grey out the stock field from the product. Initially it is not critical that you do this but as you become more familiar with the software you will start to use areas like Purchase Orders. If the stock quantity is below zero, whenever you attempt to automatically fill in a purchase order based on shortages you will also include any items that have a negative stock count.
Exercise 1.
As an exercise in the following screens shots I will create a product called Cappuccino costing $3.20 that will be located in the Hot Drinks Menu/Department and the Coffees Category. See images below
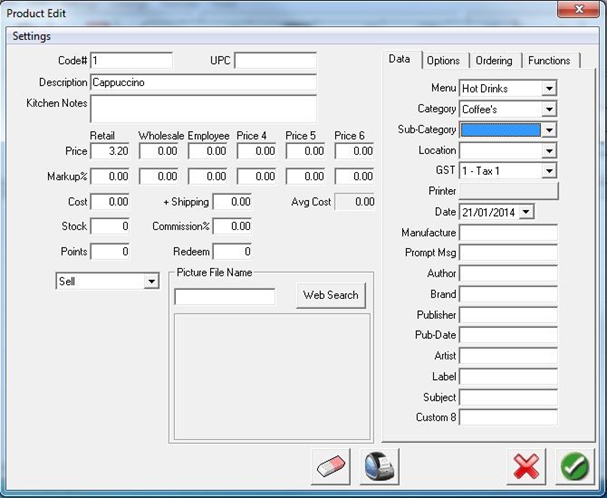
After Saving this will appear in the sales window as below.
