 Loading... Please wait...
Importing and Exporting Product Information.
Posted by Microtrade Australia on 15th Sep 2022
Importing and Exporting Product Information.
The system has the ability to import of export data. This can be useful for doing initial setup or for setting up a second store if you intend to use the same products and pricing.
Save Inventory.
Version 14 has a new feature. You can now save and load data rather than exporting and importing it. To save data you will need to go to Manager from the Main Control Screen. Then Product Control. Using File in the top left corner of the screen you will see an option Save Inventory. Using this option will create a file containing all of your product data.
Load Inventory.
The load inventory feature enters data into the system from a previously completed Save Inventory operation.
Exporting data
There are several options that are used for exporting data. All are accessed by selecting Manager from the Main Control screen, then Products and Product Control. Once on the product control screen the export options can be access from the File option in the top left hand corner of the screen.
Export Inventory XML (for 3rd party software.)
This option is used to export a copy of the product database in XML form. It is only to be used with other programs that utilize XML files.
Export list.
If you do not have any items displayed on the Product Control screen selecting this option will create a file that ONLY contains the headings of the fields that the database uses. It can be used in conjunction with Excel and other spreadsheet programs to prepare a bulk import sheet that allows you to load the system with products in bulk.
If you select this item after first clicking the Search or the List all buttons the system will then export a spreadsheet that contains the headings as described above but it will also contain the information relating to the products listed on the screen.
If you are going to be using this feature to load your product data in bulk for the first time then I would suggest that before you export the list that you manually enter at least one product so that you can see what the various fields in the list are used for. (See the chapter, Adding a Product)
Export Label Fields.
Selecting this option will create a file that ONLY contains the headings Item Description and Price1. If you have products displayed on the screen then it will also list the data contained in the database for these fields.
Importing Products (older Versions)
Selecting this option allows you to import data from previous versions of the program or you can use it bulk import a product list.
When you select this option a new screen opens.
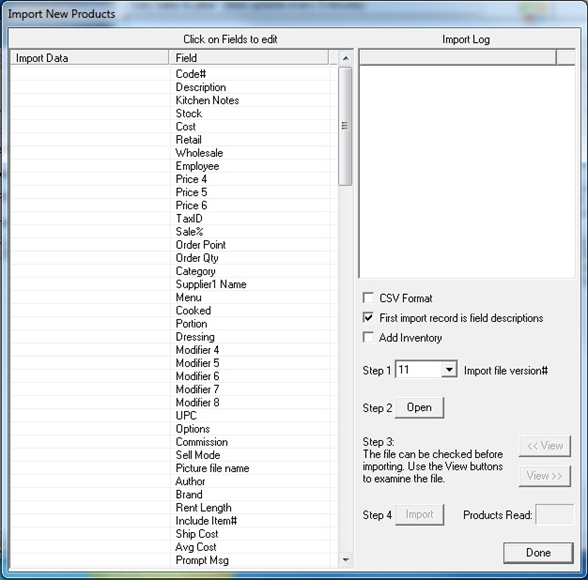
Importing data is done in 4 steps.
Step 1. Select the version that your data file is from, if importing data from an older version of the software or leave it as 11 if you are importing a product list that you created yourself.
Step 2. Click open and the system will bring up a new navigation screen so that you can located and select the data file (product list) that you intend to import.
Step 3. You will now be able to see that the left column of the screen has been filled in with the headings from the data file (product list) that you are importing.

You should now check the two columns and make sure that the fields on the left hand side match the right. If they do not match (and there is a good possibility that they won’t so make sure you check) you need to make them match. You cannot do anything with the left hand column in this screen all work will be completed in the right hand column.
You can see from the example above that the first row of the column is Code# and this matches on both the left and right column so there is no need to do anything here. In the second row the left column has the field UPC and the right column has Description so this needs to be fixed or the data that was intended for the UPC field will end up in the description field.
Clicking on the right hand field will turn it into a drop down list.
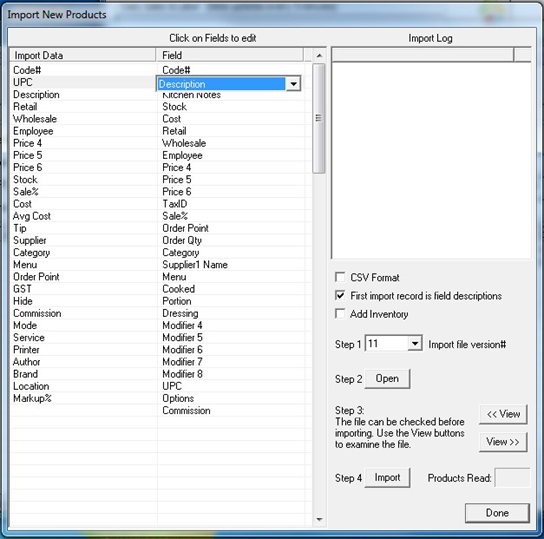
Once it is a drop down list you can click on the down arrow on the right hand side of the box and locate the same name as the column on the left

Once selected the two columns should match.
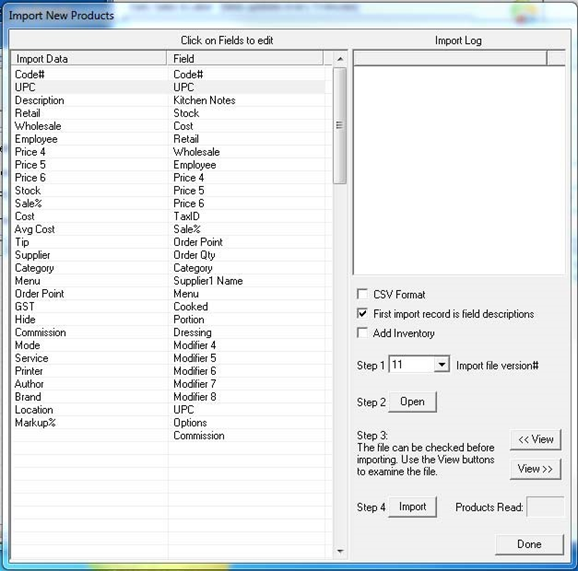
Continue this process until all the row have the same value on the left and right.
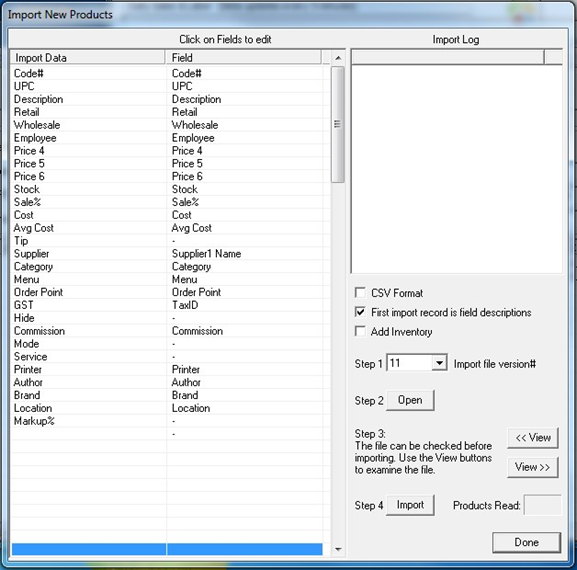
You will note that I have not matched all the fields. Some if the fields on the right now show a -.
This is because there was not a matching entry in the right column I have selected the last item in the list, the “-“
Please note that if you do not match the fields left and right or use the – in the right column the data that you are attempting to enter will go into area’s that it was not intended for, possibly causing unpredictable results.
In this step you are also able to check to see of the data you are entering is going where you expected. Just to the right of where it shows Step 3 are 2 buttons for View right and View left. Clicking these buttons will cause the left column to scroll though the data that you have entered into the sheet that you are importing, allowing you to check to see if things look right.
This is the time to stop and go back to the import sheet and make changes if things are wrong.
Step 4. Click import.
This will take all of the data on the import sheet and enter it as products in the product database. You will be able to watch the number of products read increase as products are entered into the system.